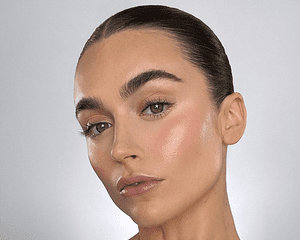
If there’s one hang-up in our morning makeup routines—one task that takes twice as long as all the others—it’s applying mascara. Foundation, tinted moisturizer, BB cream—these can all be smoothed on and blended in well under a minute. The same goes for concealer. Blush and lip color are most likely done in 10 seconds flat. But mascara is really what’s holding us back from mastering the under-five-minute face.
The problem is, like many women out there, we wouldn’t dream of braving the day without mascara. Enter DIY lash tint. While for most it’s not a mascara replacement, it is an effective solution for taking barely-there lashes and turning them into lush, dark, glossy eyelashes. However, tacking on a monthly professional lash tint can be an undue addition to an already tight beauty budget. That's where at-home eyelash tinting comes in, but not without some risks, according to dermatologist Rachel Nazarian, MD.
"There are certainly risks that accompany the treatments—mostly because the eyelashes and surrounding skin are incredibly sensitive areas of the body, and many people have allergies to various pigments that are used to color hair. However, it can be done safely for many people," she says.
We asked the experts about at-home lash tint and all the benefits of a salon job but from the comfort of your powder room.
Meet the Expert
- Rachel Nazarian, MD, is a board-certified dermatologist and fellow of the American Academy of Dermatology. She specializes in cosmetic treatments, skin cancer, and dermatologic surgery.
- Amanda Robinson is the founder of buzzy L.A. and San Francisco–based lash company Iris + West.
Read on to learn how to tint your lashes at home.
:max_bytes(150000):strip_icc()/tint-own-eyelashes-6f4c6fa34a484b6d9109822728e76557.jpg)
Materials You'll Need
• Henna (or a tint kit)
• Water
• Petroleum jelly
• Cotton pads
• Q-tips
• Spoolie
Mix Ingredients
In a small glass bowl, combine the tint and a small amount of water, and mix until you’ve reached a paste consistency. You don’t want the mixture to be too watery, because it will drip. "For the tint kit, I prefer the RefectoCil products. You'll need tint (I like black or blue-black) and oxidant," says Robinson, although henna will work as well. Try Rainbow brand's Henna Hair Color & Conditioner ($6). It's worth noting, says Nazarian, that lash tinting isn't FDA approved so techniques and ingredients may vary as you come across your research.
Prep Lashes
Make sure your eyelashes are clean and dry, with no mascara or makeup remover residue. Apply a layer of petroleum jelly to the skin around the eyes to protect it from stray dye. For extra insurance against stains, you can place strips of paper towel underneath your eyes. (They’ll stick to your skin thanks to the petroleum jelly).
Byrdie Tip
Curl your lashes before applying the tint. You'll find it's much easier this way.
Apply Tint
Dip your clean spoolie into the color and roll it around to ensure the bristles are evenly coated. Then, start applying the tint to your lashes as if you are putting on mascara. Start with the lower lashes to avoid smearing the tint on the upper lashes. And remember to dot the very tips, which are always the lightest. "Do one eye at a time, and make sure you're brushing both the top and bottom of your lashes. Don’t forget to focus on the tip of your lashes where they tend to be lighter," says Robinson.
"The process of tinting does not affect hair growth—it’s similar to a classic dye-job of your hair, where the color of the lash is darkened to make them more noticeable,' adds Nazarian. "It does not affect on thickness or length, and ultimately lasts as long as your lashes do before they naturally fall out."
Wait it Out
Let your lashes "process." Robinson recommends erring on the side of caution and doing a couple of minutes less than what is suggested.
While you're waiting, think of the benefits, and Robinson says there are many. "I love lash tints, A lot of our clients are opting for more subtle lash enhancements lately; it’s a total time saver as it darkens your lashes from base to tip which can make your lashes appear longer, so you can skip your mascara if you want."
And how long does eyelash tint last? Well, usually anywhere from 4 to 6 weeks, with a month being the most common.
We'd be remiss to let you know that there are some risks, too. The most important point to consider with lash tinting is a possible allergy, which, according to Nazarian, "can be incredibly upsetting and uncomfortable around the eyes." She recommends a patch test on your wrist to check for any redness or irritation before you commit to tinting. "It’s a small inconvenience that can save you a huge headache," she says.
Key Takeaways
- Make sure your tint isn't too watery so it'll adhere to your lashes and not drip down your face.
- To be overly cautious, let the tint process for a few minutes less than the suggested time.
- To avoid an allergic reaction, do a patch test of the tint on your wrist.
Gently Remove
Head to the sink and use wet cotton pads to gently wipe off your lashes. Note: It may get a tad messy. You’ll need a few passes with the cotton pads, and a quick rinse will help get the last bits. Once you’ve washed the tint off you’re good to go. "I always recommend LashFood (it’s a lash growth product that uses peptides and amino acids to help your lashes grow) to all my clients whether they do any lash services or not," says Robinson.
The Final Takeaway
We love long, healthy lashes. Over-processing your lashes can make them brittle and, therefore, break more easily, so take great care when doing this process at home. "Lash tinting is safe for your natural lashes but don't do it more than every four to six weeks," says Robinson.